"My darling girl, when are you going to realize that being normal is not necessarily a virtue?
It rather denotes a lack of courage."


~Practical Magic~

Digital Freebie Update

Just to let you know.
The digital freebies found on the right hand sidebar have been updated and now are ready for downloading.
Showing posts with label tutorials. Show all posts

Saturday, October 1, 2011

That time of Year

When my thoughts drift to Grand Pumpkins, apples and cider, fuzzy sweaters, cool sunny days and the beauty of the color in the trees.

 I thought it would be fun to share through out the month some crafty ideas to get you started for your Fall and Halloween decorations.

Tip Nut has a collection of DIY Halloween  tutorial projects collected from around the net.
  Here are just a few of projects that you will find on this link.
You may also click on the photo to go directly to the project.

                                      Silhouettes "The Pink Peony of Le Jardin"

                                     Tree Silhouette "Folding Trees"

Halloween Garland " Kansas City Etsy"

Cupcake Stand "The Swell Life"

Have fun and Thanks for stopping by :)

Saturday, February 26, 2011

February Projects of Love

February projects have been a labor of love for me.
Each one is an outward expression of my month of Love.

I like to use challenges to help keep me motivated. Making sure bits of time are in the day for a creative outlet.
 Which is very limited these days !
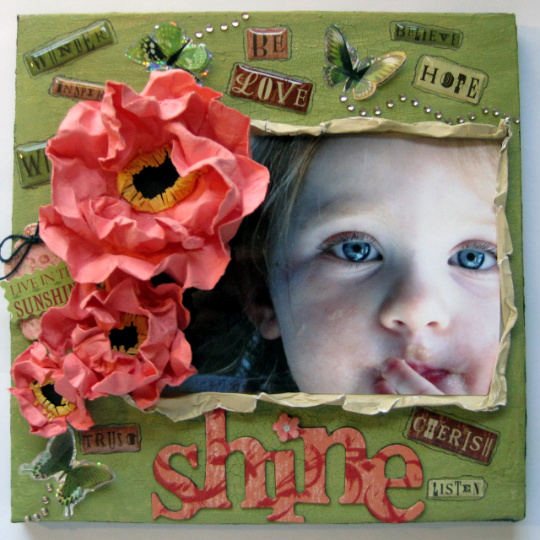
Combining a "Catch Light" photo challenge and a challenge by Helen to use four different types of stickers inspired this fun project.

A canvas (Dollar Store) and Crackle paint for my background
 Poppies and a beautiful little girl (one of my Granddaughters) helped to inspire!

Pleased with finally using up stickers that I have had around for some time.


Art Journal Project

I really wanted to slip in some time to work on my Art Journal this month and again used a Word challenge for creating a scrapbook page .
Sadly, I thought I had saved the link to this challenge site. So sorry :(

The word to inspire was "Drama"
My art journal is based around trying different techniques and mediums.

Using Plastic Wrap and acrylic paints to create the background.
Clear Acetate Sheet used to create the wings with a touch of "Dollar Store" Glitter Glue.
Stenciled in the stone wall onto black Card stock.

Part of the Challenge... use journal on your page.
 I thought it might be fun to push myself and use symbols for what I was trying to express.


Clear Crackle Glossy Accents add both a smoky glass effect to my door and age to my hand Silhouettes.

Quote by Erma Bombeck

When I stand before God at the end of my life,
I would hope that I would not have a single bit of talent left, and could say
"I used everything you gave me."

Love the Time Piece from Tim Holtz Collection!
Thank you Paper Secrets for all the hardware!

             The  "Sisterhood of Scrap" Hosted a Month Long 
                               "Your Crop Your Way "
                           for the month of February.
      Sisterhood Feb "Your Crop Your Way" Challenge
     Jackie's Challenge /  Love, Acetate and Hidden Journal 

      Paper Secrets /  Feb Technique Challenge
Two very loving people I know...my DS AND DIL.

I loved seeing you both over the Holidays, thank you for the Christmas memories XXOO


Sisterhood Feb "Your Crop Your Way" Challenge 
Lindy's Sketch Challenge using a Sketch found on Page Maps.com

My youngest Granddaughter ,DS & DIL celebrated her first Christmas this year.
What a happy little baby ! XXXOOO


Sisterhood Feb. "Your Crop your Way" combined 2 challenges

Tabitha's Challenge / Journal Strips


 Jo's Challenge / 3 different ribbon used 3 different ways.

My 2 little Granddaughters and (Grand niece in the middle)
A special little moment they shared together at their Great Grandmother's house over the Christmas Holidays.

Silly little girls... :) XXX OOO

And my contribution challenge to the "Your Crop Your Way Challenges"  Create an ATC Holder.

The SOS is also hosting an ATC Swap for the month of Love,
this little project could come in handy for those of you who like to create and trade those little pieces of Art.

Will post my ATC once the swap is complete.


Here are a couple of videos to help along in creating these
  little holders.


Last, certainly not the least  this wonderful Art Inspiration piece contributed to the "Your Crop Your Way" Challenge by Gail D.

Also, my inspiration came from two very special friends in my life.


Will post my finished project in the next day or so.
There are photos, links and details I would like to share with you for this project.

This beautiful piece of Art Work inspired me in so many different ways, one of the favorite ways I like to challenge myself.

Thanks so much, Gail for sharing this lovely and serene art work.
I think I would like a copy of this for my home!

And to my long lost friend.  Laurie...it was a lovely surprise to reconnect with you after so many years!
Enjoyed our visit very much.
Happy you liked and could use the "Paper Bag Wreath"  

Thanks for stopping by ... it's always a pleasure to see you all  :)

Sunday, October 24, 2010

How To...

This past week I spent some time just hopping around the Blogger World.
I came upon 2 tutorials that I knew I just had to try.

I thought I would share the links with you, just in case you had not discovered them yet.

The first one, is for the beautiful flowers seen in this  lo of my eldest Granddaughter.
(Yes, I know I spelled Nicaragua wrong : ) !

You may found the tutorial here courtesy of "Scrap Factory" .
There is a language translator there in case you need it.


The next is for the overly grunge and crumpled paper you will find here in the lo of my youngest Grand Daughter.

I have seen this technique on other layouts and loved the result, just not sure of a good way to go about achieving it.
 I found this tutorial to be very helpful.
 Thanks to "Scraps of Reflection" for posting this tutorial !


I also wanted to share my own tip with you today.
For my chipboard in the lo above, I used White Puffy Paint and a few drops of Alcohol Ink to achieve the desired color and texture I wanted to add to my chipboard.
No worries about adding the extra liquid to your Puffy Paint.
Works just fine!
Photobucket

Wednesday, April 21, 2010

Earth Day Blog Hop - Day One

Please


Welcome to Create It- Green's Earth Day Blog Hop!! Thanks so much for joining us!

If you are following along you should have arrived here via the very creative Jennifer.

Is her project today just about the cutest !! love it!

If you just happened upon this blog and didn't realize a blog hop was taking place, please go back to Create It Green and start the hop.

You won't want to miss all the Earth Day inspiration or the amazing prizes from our generous sponsors! Make sure you leave a comment on each blog on the hop since winners will be drawn from the comments!!


Today's project I would like to share with you is a child's hat created from 3 t-shirts that were destined for my Husbands rag bin.
Also a very simple way to gussy up a child's T-shirt and help get the message out, to help protect our environment.

After all, isn't this all about saving the Earth and her many resources for future generations!
You will find the pattern and simple instruction here for the infant hat provided by Prudent Baby.

I did end up creating my own pattern from a smaller hat that was very similar in style to the one in the link. I needed to enlarge it to fit my lovely granddaughter's head.
Follow the instructions for putting this hat together in the link provided.

Found a tutorial here by "Material Magic by Shar" for the adorable flower for the top of the hat.

Turning it upside down and sewing it on.

Coloring this cute "Earth Day" Graphic generously provided by "Meljen's Delights" and transferred it onto Iron on Transfer Paper and applied the image to my hat.

For her T-shirt I used this sweet "Save Our Trees"digital image provided by another generous sponsor "Digital Delights".

Colored it scanned it into my computer,then again printing onto Iron on Transfer Paper.

Easy and fun way to get the message out there!!

After all one is never to young to be taught to appreciate the environment and resources that surround us!


Stop back by on Sunday Day Four of our Earth Day Blog Hop.
I will have another project to share with you
This blog hop will run from today, April 22ND until Sunday, April 26TH, midnight PST. We will be drawing for winners on April 27TH.

Follow along in our blog hop! your next stop will be one creative and earth friendly lady Ali !

EDITED/ I apologize to everyone , but due to family matters out of state I will be unable to continue with the hop.

Thank you all for your generous comments on my projects and my Grandaughter.

Have fun with the hop and good luck to you all on the wonderful prizes donated by our sponsers!

Sunday, November 29, 2009

Create It - Green Blog Hop


Create It-Green is hosting it's first Blog Hop on December 5Th.
An exciting Day of Blog hopping , tutorials and prizes on December 5Th, starting at Noon EST.
Hope to see you there !

Saturday, November 7, 2009

New Green Blog

There is a new blog for all you crafty greenies out there!

Called CREATE IT-GREEN hosted by Deanne Burton.
Deanne is looking for 9 Design Team Members to contribute projects, layouts and cards.
All geared toward going green with your Scrapbook & craft creations.
You will find all the details here.

There is still plenty of time to get your submissions in if you would like to be a part of this new adventure.
Hope to see you there!

Thanks for stopping by my world : )

Wednesday, August 19, 2009

Flowers & Onions

This weeks Recipe Card Challenge , FLOWERS !!
Either use them in your layout or in a recipe.
What better than a Blooming Onion appetizer.


A couple of tips when preparing this recipe.
1. If you use your favorite brand of soda instead of beer, your onion batter will be sweeter.
2.Refrigerating your onion after coating will help set the batter.
3.Make sure you completely dry your onion after soaking in water.
4. you can use any of your favorite seasonings after onion has been cooked or mix into flour.
Tasty....tasty !!! Just make sure you have plenty of breath mints on hand after eating : ) !
Flower Tutorial Links.
Have a great day and thanks for stopping by My Crafty World !

Friday, April 10, 2009

Egg-cellent Easter Ideas


Preparing , for the Easter celebration would begin on Good Friday when I was a young girl,
a tradition that I have tried to carry over with my family.

Easter Egg coloring would be done on Friday evening and finished up by Saturday morning.
Making way for the preparation of any foods that may be made ahead.
The best dishes would be brought out and cleaned as well as the silver.
By the afternoon thoughts would go to the decorating of the table.
With my Grandmother offering up some fun ideas for the decorating .

Here are some links of Easter projects that I personally thought might be fun for the whole family to try.

First on the list is the decorating of the eggs.
Nicole Wozniak, creator of "Lumpy Page Designs"
has posted some fun tutorial projects this week on her blog , showing different techniques on decorating your Easter Eggs.


Some wonderful ideas from" Purple Trails "for those Easter Egg Hunt for the kiddies also some printable Easter games to keep the young ones busy while the finishing touches to the dinner and table are being added.
Jeanne Winters of "Inspiring Ideas "
Decorating your Holiday table with paper Mache Eggs.
Quick and easy project that adds such a nice touch to the Easter Celebration.


Andrea Walford from "Sunny Stampin"
Has the cutest idea and tutorial for a Center piece , would make a great companion for the Paper Mache Eggs.

a tutorial on how to create a rabbit fold for your Easter dinner napkins.

a quick and easy tutorial for dressing up candles for the Easter table with stamps , tissue paper and wax paper.
The end result looks very nice.

That's it for today..hope you all have a wonderful Celebration of the season !
Thanks for stopping by : )


Saturday, January 31, 2009

Rag Doll

Finally, a little spare time to sit down and share.

My grandmother would spend her winter months sewing .
At any given time you would see her with some type of thread or yarn in her busy hands.
Whether it was tatting , embroidery ,yarn ,doll dresses you name it she created with it.

Her stitches were perfect with speed from her hands.
I imagine working in a glove factory in her early years did help in improving the speed at which she was able to create.
Under Grandmother's watchful and helpful eye she guided all the women in our family to learn how to sew.

My first lesson to learn was mending socks.
Having painted faces on Grandmother's Darning eggs helped to hold all our attention.
As we grew older so did the lessons she would share.
I still find myself looking for a needle and thread in the winter months as some old habits are hard to give up.

I love the look of Primitive Art and decided I would try my hand at it.
Here is a little project I created while teaching myself some of the tricks to Primitive cloth creations.

Lets see...there is tea dying , Using Ranger Ink, painting, embroidery, creating hair from Rags,stitching a 3d nose and drying techniques.


I used an old shirt of mine and some lace from a set of my grandmothers old curtains (just to old to hang :) for the dolls dress. Touch of embroidery for the smock.


A close up of her face and hair. Not having any yarn for her hair ,I used strips of left over cloth from my doll pattern.


I need to finish her shoes with laces, still have not decided on how I want them to look.


Here are some links I found helpful in helping me to create this doll.

Pattern Jackie's Girls by Annie's Cupboard
How to Needle Sculpt a Nose tutorial by Traci Dunn Courtesy of PrimMart
contributed by KKL Primitives
If you really want to see some wonderful Primitive Creations out there...check the ones showcased on the Ditty Bag...such creativity and talent in the World of Primitive Crafting.
Just a little thanks to all the crafty folks out there,who spend the time and willingness to share all the helpful tips and Craft tutorials found in the cyber world !
They help bring Crafting back to the kitchen table for sharing.
Take Care and a Crafty Day to you all :)


Friday, September 12, 2008

Haunted Halloween House

Due to bad Internet connection, I have been unable to update my blog for the last few days.

Just wanted to shout out to all you ladies who are celebrating with me on my Blogoversary Celebration Challenge..Thanks for playing along and Good luck!

Some fantastic Fall ideas have been coming in and hope you will find something fun and inspiring to take away with you in honor of the season.

I know I have !!
I went and bought some Macintosh Apples from our local orchard and hope to try the Yummy Apple Crisp Recipe that has been shared .
( Just a little hint ; ) of what wonderful ideas have been posted ) !
Check it out in the next post down !

I wanted to share with you a Haunted House Printable I came across and a link for this fun fall project.


Here you will find printable images to construct many different Haunted Houses already embellished and ready to print.
Would make a fun project for the family on a cold rainy fall day.
A whole village of Hunting's!!

They also have a template for constructing a Gingerbread Haunted House, with template, visual and written instructions.
I wanted to decorate my own to fit into my home decor.
I used the cake template provided for the Haunted Gingerbread House adding tabs to the template to help bind it all together.
How do you like that chimney smoke, BATS !!! ooh noooo!!

Inkadinkado has this wonderful Halloween Flourish in a clear Stamp!
If you try this project please let me know,would love to stop by and see what you have created :) !
Have fun !
EDITED: to mention I left the bottom of my Haunted House open, so I could place a battery operated candle underneath.

Thursday, August 28, 2008

Flowers & Light Box Links


It seems to me, here in my little world the Spring & Summer have gone by far to quickly.

June I purchased Doodlebug Chipboard Flower & Vase Project with
the idea that it would make a fun project for my Granddaughter's nursery.

Here it is the end of August and I have now just got around to completing this project!
Where has the time gone to ?
All in all though,I am happy that I finally was able to settle on the colors and it is now completed and will make its way into the baby nursery this weekend.
I have also been surfing the web reading up some tips & tutorials for creating your own light box to photograph your projects and layouts .
I have yet to create one for myself but hope that sometime thru the weekend I may have this project completed.
For now I am testing materials and ideas that will suit my taste & needs.

Here I used foam board using natural light,still to many shadows :) this is just a test for types of materials I would like for my box.

There are some links for you at the bottom of this post if you are interested in giving it ago your self.


Thanks for stopping by ..have a happy & safe Holiday :)


Saturday, August 16, 2008

Challenge #6 Yellow, Red and Green

Options for Challenge # 6 a Card or layout using the colors red,yellow & Green.
As you can see I decided again on a card. I found the template instructions for the card here


Thought I would share a few more Pin Cushions that I created ,the weather has been so nice I just had to take myself out to the deck and enjoy the beautiful day...just a bit windy for paper,thought it would be a good time to finish up some of those stocking stuffers!


Don't forget you have until the 3o TH to complete the challenges for the Blogoversary going on at "Am I a Scrap Addict".
Hope you all have a Happy Scrappy Day :) !

Thursday, July 24, 2008

Felt Pin Cushion


Surfing around on the web a couple of weeks ago I came across this little felt project for a pin cushion,and could not seem to get it off my mind.Especially since I am always hunting for my needle that I use only for Scrap booking.

I started saving soda bottle tops and decided that maybe it was time to give it a try since the lids were starting to take over my desk.

I can see this little project making its way into some Christmas stockings as a stuffer this coming holiday.
Sorry about the clarity of the photo but my camera is slowly trying to come back to life after a loose wire.

If you would like to try this fun little project you may find the tutorial here contributed by
Jen Segrest courtesy of CraftStylish.com

Maybe now I can settle back down to finish a couple of more classes :)

Wednesday, May 28, 2008

Budget Storage

A couple of fun small projects for the budget .

Easy and inexpensive Ribbon storage idea
Tuesday Tutorials at Di Hickman's Blog ,via newsletter.
Thanks to You for sharing!
I love newsletters!Great source of information!


Here are a couple of metal tin projects for storage.

Both began originally as Cookie Containers.
The ribbons are leftover from Christmas packages that I received this past holiday and stored away for future use.

Gesso is used to first prime both the metal tins.

The first tin is covered with brushed on Gold Metallic Paint -dried and covered with Mod Podge,
added Alpha rub-on,tag and a ribbon-now is storage for all my small rulers.


Second cookie tin is also primed with Gesso and finished with Mod Podge.
I used a sponge to apply my paints first starting with the lighter colors and moving on to the darker shades.
Added my ribbon left over from a box of Christmas Candy.
Thanks for stopping by..hope you have a happy and creative day :)

Sunday, May 18, 2008

Accordion Fold Recipe File


Have been busy this week crafting and making plans for Recipe boxes for Christmas gifts.

I find that when ever I go to visit my children or they come home for a visit there are always requests for some of their childhood favorite dishes.

Searching the web for some templates and ideas ,came across this tutorial that was my starting point.

Created the flap by measuring the width and then the height x2 and allowing for the overhang.
Mod Podged for added strength.
This file holds 120 3x5 Recipe cards,this file also will handle more..that is just the amount I used to fill my recipe box.

Discovered that by adhering double sided tape and Mod Podge together,it created the strong bond I was looking for to hold together the joining accordion folded sections.

It all went together fairly easy using Basic Grey Hang 10 and bits and pieces of left over Patterned Papers and embellishments that have been sitting in my stash forever.
Great Way to use up all those little left overs!

Monday, February 4, 2008

Playing with Digital Brushes


Well it took awhile...but I finally started playing with digital brushes in my PS.


With some inspiration from here to try my hand with my own hand drawn doodles and a mini tutorial from Scrapbook Etc. Feb/March 2007 issue I gave it a go.


Working with an older program of PSE 2,had to play around abit with the tutorial to find what would work for me.


drew my doodles on clean white Sketch book paper with black marker

scanned at 300dpi and saved to folder

opened folder in my PSE

ticked edit and define brush

name brush and save.


This is my lo using my own digi doodles..lot's of fun.. look forward to learning more about digital brushes.


Tuesday, December 4, 2007

Dress up those packages

Wrapping Paper Jean Marie


box by Craft ideas

Tags by Jessica Acs


Martha's Ribbon


Decorations are up,the tree is trimmed and the holiday shopping is in full force.

Instead of the traditional wrapping paper that is found in your local stores ,why not take the time to give those holiday gifts a special touch of your own.
A few ideas that I came across that I found helpful.
A tutorial by Martha Stewart to help give you the perfect bow every time.
And of course we need some cute little Christmas tags to add to our beautiful ribbons.
Here is a tutorial by Jessica Acs for some Holiday tags courtesy of iScrap that really add to the holiday spirit of your packages.

How about your own little gift box for that special little Holiday treat that you would like to share .While you are visiting check out all the other fun projects that are available for your viewing at Craft ideas lots of Holiday Inspiration to be found.

One of my favorite sites Country Living has some helpful ideas for Holiday packaging and wrapping


My personal favorite is to stamp onto plain Crafting paper with my Holiday Stamps,add a touch of ribbon and you have added not only your own personal touch to your gift but also to the wrapping.

Some other wonderful Holiday ideas may be found on these sites....Have fun!


Friday, November 30, 2007

Traditional Advent Calendar


Growing up in our house we always had an Advent calendar to help count down the four Sundays before Christmas.
Times have changed and so have the many types of Calendars that may be found to help count down the days before Christmas.
With a tutorial located in the tutorial Section of iScrap designed by Jessica Acs,
My advent Calendar was easy and fun to make.
I used coloring book pages scaled to size for my pocket covers, and traditional advent activities located on the web to my tags with some fun activities scattered in the mix.
Glitter Gel pens to add some glitz.
Lots of fun and easy to make project..so many possibilities to make this tutorial work for your personal Holiday celebrations.