"My darling girl, when are you going to realize that being normal is not necessarily a virtue?
It rather denotes a lack of courage."


~Practical Magic~

Digital Freebie Update

Just to let you know.
The digital freebies found on the right hand sidebar have been updated and now are ready for downloading.
Showing posts with label projects. Show all posts

Saturday, October 1, 2011

That time of Year

When my thoughts drift to Grand Pumpkins, apples and cider, fuzzy sweaters, cool sunny days and the beauty of the color in the trees.

 I thought it would be fun to share through out the month some crafty ideas to get you started for your Fall and Halloween decorations.

Tip Nut has a collection of DIY Halloween  tutorial projects collected from around the net.
  Here are just a few of projects that you will find on this link.
You may also click on the photo to go directly to the project.

                                      Silhouettes "The Pink Peony of Le Jardin"

                                     Tree Silhouette "Folding Trees"

Halloween Garland " Kansas City Etsy"

Cupcake Stand "The Swell Life"

Have fun and Thanks for stopping by :)

Saturday, February 26, 2011

February Projects of Love

February projects have been a labor of love for me.
Each one is an outward expression of my month of Love.

I like to use challenges to help keep me motivated. Making sure bits of time are in the day for a creative outlet.
 Which is very limited these days !
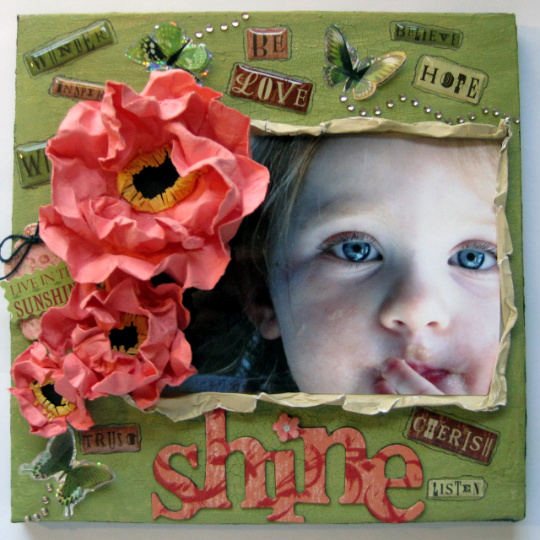
Combining a "Catch Light" photo challenge and a challenge by Helen to use four different types of stickers inspired this fun project.

A canvas (Dollar Store) and Crackle paint for my background
 Poppies and a beautiful little girl (one of my Granddaughters) helped to inspire!

Pleased with finally using up stickers that I have had around for some time.


Art Journal Project

I really wanted to slip in some time to work on my Art Journal this month and again used a Word challenge for creating a scrapbook page .
Sadly, I thought I had saved the link to this challenge site. So sorry :(

The word to inspire was "Drama"
My art journal is based around trying different techniques and mediums.

Using Plastic Wrap and acrylic paints to create the background.
Clear Acetate Sheet used to create the wings with a touch of "Dollar Store" Glitter Glue.
Stenciled in the stone wall onto black Card stock.

Part of the Challenge... use journal on your page.
 I thought it might be fun to push myself and use symbols for what I was trying to express.


Clear Crackle Glossy Accents add both a smoky glass effect to my door and age to my hand Silhouettes.

Quote by Erma Bombeck

When I stand before God at the end of my life,
I would hope that I would not have a single bit of talent left, and could say
"I used everything you gave me."

Love the Time Piece from Tim Holtz Collection!
Thank you Paper Secrets for all the hardware!

             The  "Sisterhood of Scrap" Hosted a Month Long 
                               "Your Crop Your Way "
                           for the month of February.
      Sisterhood Feb "Your Crop Your Way" Challenge
     Jackie's Challenge /  Love, Acetate and Hidden Journal 

      Paper Secrets /  Feb Technique Challenge
Two very loving people I know...my DS AND DIL.

I loved seeing you both over the Holidays, thank you for the Christmas memories XXOO


Sisterhood Feb "Your Crop Your Way" Challenge 
Lindy's Sketch Challenge using a Sketch found on Page Maps.com

My youngest Granddaughter ,DS & DIL celebrated her first Christmas this year.
What a happy little baby ! XXXOOO


Sisterhood Feb. "Your Crop your Way" combined 2 challenges

Tabitha's Challenge / Journal Strips


 Jo's Challenge / 3 different ribbon used 3 different ways.

My 2 little Granddaughters and (Grand niece in the middle)
A special little moment they shared together at their Great Grandmother's house over the Christmas Holidays.

Silly little girls... :) XXX OOO

And my contribution challenge to the "Your Crop Your Way Challenges"  Create an ATC Holder.

The SOS is also hosting an ATC Swap for the month of Love,
this little project could come in handy for those of you who like to create and trade those little pieces of Art.

Will post my ATC once the swap is complete.


Here are a couple of videos to help along in creating these
  little holders.


Last, certainly not the least  this wonderful Art Inspiration piece contributed to the "Your Crop Your Way" Challenge by Gail D.

Also, my inspiration came from two very special friends in my life.


Will post my finished project in the next day or so.
There are photos, links and details I would like to share with you for this project.

This beautiful piece of Art Work inspired me in so many different ways, one of the favorite ways I like to challenge myself.

Thanks so much, Gail for sharing this lovely and serene art work.
I think I would like a copy of this for my home!

And to my long lost friend.  Laurie...it was a lovely surprise to reconnect with you after so many years!
Enjoyed our visit very much.
Happy you liked and could use the "Paper Bag Wreath"  

Thanks for stopping by ... it's always a pleasure to see you all  :)

Wednesday, December 29, 2010

Happy New Year

Hope, everyone has had a peaceful and Happy Winter holiday's season celebration.

This poor old Blog of mine sure has been neglected this year.

Not, for a want of some great crafty, scrappy ideas or projects that I have come across in my blogger travels .
There are some wonderful techniques and projects out there that have been shared.

 To many Hats for me and not enough hands for the day ! ; )

Still here, though  : )

Looking forward to a Fresh New Year!
  I am going to attempt to clean up and organize this blog.
Hoping, it will make it a little easier to find links and projects I have shared with you all in the past and will be bringing to you in this New Year.

To end off the last post of the year for me.

I just want to give you a little update on what is happening with the ladies at the "Sisterhood of Scrap" Forum for the month of January.
Going to be some fun Challenges for you all.

Come on over and join the girls at Sisterhood of Scrap (SOS)! This is a great place to hang out, meet other like-minded crafters, and have a good time!! January happenings at SOS:

*We are going to be having a photo challenge by our esteemed photographer Sonya!! (Can't wait for this one!).
*Maggi is going to present a Photo Shop Elements (PSE) Challenge along with some tuts!!
*Colleen, our culinary queen, is going to host a Recipe Challenge of sorts!!
*We are going to be presenting a "Sister Blog" of the month!! Not telling you who the first one will be 'cause I don't know!
*We are going to be having a one-hour crop on January 23d hosted by Helen!
*We are going to be holding a "January White Sale" Contest (that will be flipping amazing!) with a prize to be won.
*And there will be a few other things too, but I can't tell you yet...
Come on over and join in!! Looking forward to seeing you over there soon!!

Thanks to, Helen for this update!

For those of you who are staying home to quietly bring in the New Year of 2011.

Scrapadabadoo will be hosting a New Year's Eve bash with projects and prizes to help bring in the Mo Jo for 2011!
 You must send off an email  to be eligible to participate in the prize drawings.

Laura Denison of "Following the Paper Trail" will be teaming up with Scrapadabadoo
for the New Years Eve Bash!

Here is a little preview of a project she will be working on with everyone.

You may find video tutorials for some of her other projects on her USTREAM Channel.

Couple of Projects of hers that I tried over the Holiday Season


Recipe Card Holders

PB and J Album
 Hoping, the New Year finds you all with many Blessings along the way.

Thanks for stopping by : )

Friday, September 17, 2010

Art Journal

You may have noticed a New Button on my sidebar, Creative Every Day.

A while back I purchased an Art Book with the intent to journal, sketch or just whatever.

Created a cover for it and designed the front, then froze!
Nothing like blank pages staring at you and no idea to moving on to the next step.

Browsing around the web I came across the Blog "Creative Everyday" and thought this is the perfect jump off point I needed.
I love the Artwork that this talented lady creates.

Though I don't submit my pages to the site. I still enjoy the creative prompts and follow along.

My goal is to use this journal to try different techniques and mediums together.
A way to expand my use of products and widen my horizon when it comes to my creative outlet.

This first page is inspired by the word "Life".

Growing up in an area, that is influenced on a daily basis, by the Haudenosaunee (Iroquois) Nation. I have always been intrigued by the Medicine Wheel and it's use in one's daily life.
Nothing fancy , just a little personal something for me to go to.

The second page in my Journal , sort of took a life of it's own.
Using only a Versa Mark Ink Pad and chalk.
The principal for this page is based on the game of looking at the clouds and finding an image.
Using chalk and a brush I let the images come forth from the page.
How surprised I was to find ( through my own eyes) what looked to be a young girl sitting on the edge of a cliff watching the sun set.
Using my chalk to bring out the image a little clearer.

This next page is influenced by the word "Fire" and a sketch created by AnnMaree a sister from the "Sisterhood of Scrap" Forum.
Using Gesso and a comb to add texture to my page. Covered over with first water color then Alcohol Ink.
The next step , I stamped with Versa Mark ,using one of my favorite leaf stamps in my collection. Then embossed with Ultra Thick Utee.
Proceeding next to masking my page with a tree silhouette and painting over the top with brown acrylic paint.
Transferring my photo onto canvas.

This page represents the stage I am at in my physical life.

Well, that is it for today , hope you will stop by and check out "Creative Everyday".

As always Thank You for stopping by "Welcome to My Craft World"

Saturday, May 22, 2010

Altered Shadow Box

A little project created for the May 15Th Design Team reveal over on the Create It-Green Challenge Blog.

The challenge was to create a project using a Square or Squares.
I thought it would be fun to use a Cigar box to create a Shadow Box for my kitchen to go along with my Flower Basket.


Cutting off the lid with an exacto knife I used the lid as my insert.

Painting my box with some crackle paint to lend an aged look.
Paint the outside and inside sides of the box.
Covering the back with black adhesive felt for a finished look.
Using brads and floral wire for the hanger.

For the appliques I again used the same material as my Flower basket.
Material is from an outdated Upholstery Sample Book.

Apply the flower fabric to double sided fusible webbing.

Draw flowers on the back of the paper of the fusible webbing, cut out flowers and iron onto your fabric square that will be used as the background.

Proceed to sew around your appliqued flowers using a Zigzag stitch or by hand.
Using a straight running stitch for the stems.

Print out quote on to Iron on transfer paper and apply to fabric.
Taking your square and center onto your Cigar box top , staple to the back.
Slip into your box and there you have it!

Fun compliment to the Flower Basket.

Thanks for stopping by and have a great weekend !! : )

Tuesday, February 16, 2010

Create It-Green DT Reveal

This month's Create It-Green Design Team Reveal comes to you this month in 2 parts.

I am just in awe with all the wonderful refurbished projects , cards and Scrapbook layouts that the DT has put together for this reveal!

Check out the card and Scrapbook layout sketches that Victoria provided to inspire the design team...fantastic ideas were created inspired by the sketches!

The altered Design Team Projects are full of wonderful gift ideas and some recipes to boot!!! Yummy!


When you have the time stop by and check out all the creations for this month and give the girls a shout out ...I am sure they will appreciate it !


Part 1 Reveal
Part2 Reveal

The project challenge for this month was to refurbish a vase , can or bottle.


Here is what I came up with. All the snowy weather we have been having in my neck of the woods has me longing for spring.


I started this project with a vase I had saved from flowers received a few years back. I tend to save my vases as they always come in handy during the spring and summer months for cut flowers from the back yard.


1. Make sure your vase is clean and dry before you begin.


2. Using dimensional paint apply your shapes...I made hearts, allow to dry completely.

3. Taking tissue paper from a gift package I had saved .
Rip into pieces, beginning at the top with small pieces.
Apply small areas of vase with a light coat Mod Podge and lay down your tissue paper over lapping at the rim. Smooth out to remove air and wrinkles.
As you move down to the larger section of the vase your tissue paper may be in applied in bigger pieces.


3. Once dry apply another light layer of Mod Podge...dry completely
Next apply one more light layer of Mod Podge , while still tacky spritz your vase with some Glitter Mist.
Turning upside down and right side up , allowing the Glitter Mist to fill in the crevices .Let set a minute then lightly dab with a sponge to remove the excess.
4.After completely dry. With a sponge dab on distressed Stickles.
for good measure I added another light coat of Mod Podge.


Trim off the extra tissue paper at the top of the vase with your exacto knife.

Continue on to embellish your vase with what ever you would like.
I used some beads that I had using generous amounts of tacky glue.
Or you can just leave it plain as it looks very nice that way also.

So that's it ! Hope my instructions are not to hard to follow :)

I also created my Cherry blossoms and Branches.
I am in the process of putting together the how to of creating your own tree branches.
So stop back by this week if you would like to know how they were created.
Hope you are having a Crafty Green Week!
Thanks for stopping by :)

Friday, January 15, 2010

Create It- Green Design Reveal

Today Create It- Green is having their first DT Reveal!

Once a month Create It- Green DT will be hosting projects, Scrapbook and Card Sketches.
All contain some type of recycled or refurbished idea.

Here is my first contribution .
Felt Heart Refrigerator Magnets for Valentines Day.
Using the large advertisement magnets that came in our local phone book and last years Magnet Calendars from the Doctors office helped to create this Eco friendly project.
Stop on by Create It- Green Blog and check out all the other wonderful contributions by the Design team for some fun recycling projects and ideas to help you on your way to going Crafty Green!

You will also find a challenge with an RAK !

Thanks for stopping by :)

Sunday, December 13, 2009

Rustic Twig Frames

Three Rustic Frames, put together to go along with the rustic theme, I have worked into my holiday decorating this year.

Finding these sweet little vintage Christmas Flower Fairy images at the Graphics Fairy.

Assembling the frames following the same basic procedures as the Rustic Stars.

Printing my images as 5x7 ,using clear Glimmer paint to highlight the berries.
Distressing Ink & a touch of Glimmer Mist lending the aged look.


Backing to 5.5 X 7.5 cardboard salvaged from the cardboard backing that came in a Paper pack and same size cut of Card stock.

All adhered together with Mod Podge to give a sturdy hold.

Hot gluing the images to the back of the wooden frames.
Adding wire wrapped around the back of frame and pulling tight for the hanger.

That's it ! Thanks for stopping by :)

Monday, December 7, 2009

Winner of Create It-Green blog Prize

The winner of the Two Sets of Autumn Leaves Clear Stamps and Martha Stewart "Doily Border Punch" is Lorretta ! Congratulations !

Thank you all for joining us in Create It- GREENS's very first Blog Hop.
You made it truly the success it was. Thank you!

I hope you had fun and will stop by time from time and check out the wonderful ideas that Create It- GREEN has to offer.

Keep your eyes open for the next Blog Hop !

Lorretta , please contact me at jpen56 at yahoo com (sorry to write it this way, must keep an eye out for spam ) with your mail information.

Thanks to you all for the kind comments and the fun you brought to this Blog Hop.

To all the wonderful contributors to this hop..loved playing along with you all and JOB WELL DONE!!
All your creations were inspiring!

Thanks for stopping by :)

Saturday, December 5, 2009

Rustic Wrapping

Have you been checking out all the creations that have been posted through out the day?
Some wonderful projects and ideas to try!

If you just happened to stop by, head back here to start from the beginning of Create It-Green's very first Blog Hop.
Don't miss out on some wonderful Green tips and Ideas for making this Holiday Season a little more Earth friendly.
Also, lets not forget all the wonderful prizes to be had.

My next project to show you, is just a fast and easy wrapping, for those last minute gifts when you are running out of traditional wrapping paper.

I also like to wrap empty boxes this way to place around the house.
Fits right in to my style of holiday decorating.

Using a empty cigar box as my base, brown paper grocery bag and natural jute twine for my Ribbon and wrappings.
Creating a Rustic Snowflake out of thin sticks cut to size, hot glued together and puffy paint for a touch of snow.
Embellishing with a Crystal brad for some bling and a chipboard greeting from my supplies.


And you are done..Eco-friendly, and festive for the season.

See you again later on...don't forget to be eligible for my prize draw...just drop a comment on any of the projects I post today and your name will go in the draw :)
Have fun!

Hoppy Holidays !

Come on in, Welcome to My Craft World !

Hope you have been enjoying Create It- Green's first Holiday Blog Hop.

Through out the day you will find Eco -friendly projects and tutorials, that we hope will inspire you to Create It- Green.

My first contribution to today's Holiday Blog Hop.

A Christmas Package Decoration.


Reusing Styrofoam that came in a delivery box to our home is the base for this decoration.

Cut down to size using an electric carving knife, made easy work of this project.
Spanish Moss adhered to the Styrofoam was used for the wrapping.

Ribbon salvaged from a past Christmas gift and berries cut from a bouquet of plastic flowers, that was destined for my Mother's trash bin to top it off.

They can be used as a decoration for your tree, or grouped together in a basket for a pretty Holiday display for the home.

Another option for this cute Eco - friendly project, may be viewed, on your next hop back here at 10:00 pm EST this evening.

I will have another project and a tutorial to share with you all.

Hope you are still awake by then...LOL!

I will also have an RAK to offer one of you lovely folks, as an appreciation for taking the time to stop by and check out all the wonderful crafters and creations you will find along today's Holiday Blog Hop.

Okay, soooo...on to the next stop of Create It- Greens first Holiday Blog Hop.

The very talented Green Crafter Jan Hennings of "Paper Craft Pleasures".

Watch for Jan at Scrapbooking.Com Magazine where her blog will be showcased DEC 14- 20TH !!

Also Jan, is celebrating her Birthday Blogoversary and is offering you all a chance to receive a " Bind it All" as part of her Celebration ! Stop on by and give her a shout out!

Thanks for stopping by my Craft World and hope you are enjoying your hop!

Wednesday, November 25, 2009

CD Holder & Tutorial Link

Playing along with this weeks Saturday Soup Challenge on the Sisterhood of Scrap.

I came upon this easy to make CD Holder tutorial while surfing through some Crafty Blogs.

This little Holder will hold 2 Cd's along with their cases.
You may find the tutorial and templates here if you would like to give it a try.


Inside view of CD Holder.
Layout created for the Sisterhood of Scrap One Hour Sketch Challenge.
Sketch was provided by Deanne Burton.
Good time was had by all !


Hope all the American Crafters and Scrapbookers have a Wonderful Thanksgiving!
A big Thanks to all of you generous folks from across the lands, who take the time to share your ideas, tutorials, projects and Scrapbook pages. You help make the community a better and fun place to create in.

Friday, November 13, 2009

Thanksgiving Tree,Recipe Layouts & Scrapbook Layouts

Has been awhile since I posted any projects I have been working on.
Thought I would share with you my most recent.

First up is a Thanksgiving decoration created for the upcoming Holiday.

I also created this tree for a call on a new Green Blog, called CREATE IT-GREEN.
All submissions must be in by the 20Th of November if you are interested in being part of the DT.

Using an empty cookie tin, some jute and dried fern for my base.
Leaves from an old Fall garland that had seen better days, glued to a Styrofoam tree and a piece of dowel painted left over from an early project.
Styrofoam that came in a package to stuff my tin and hold tree in place.

Next up Some Recipe Cards for Recipe Card Challenge Blog.
thought I gave up on this one didn't you? LOL ...just sort of got sidetracked for awhile...but no, ready to get down to business and get that recipe box filled up.

This cake is so yummy!!!! has been around for years. Thought maybe you new mothers and wives out there might not have heard of it and would like to give it a try...makes for a fast and tasty treat when company comes calling.


A favorite morning breakfast for a cold and snowy day...will stay with you all morning.


Next 2 layouts were created for Challenges posted on the Sisterhood of Scrap Blog / Forum.
My sweet little Grand daughter Sophia as Snow White this Halloween.
Monday's Challenge on the SOS was an Inspiration Challenge.
This layout was created for the Saturday Soup Challenge on the Sisterhood of Scrap.
Took a trip up North to visit family.
My cousin and I took a road trip in search of our Colonial ancestors. Searching for the churches they had attended and cemeteries theywere buried in.
What an adventure and a privilege to be able to share with her.
We were also lucky enough to find the road they had first settled on after coming to America.
You may see some of these places in this post with a video I created.

Well, that's it for now.
Thanks for stopping by My Crafty World.
Wishing you all a great weekend :)


Saturday, November 7, 2009

New Green Blog

There is a new blog for all you crafty greenies out there!

Called CREATE IT-GREEN hosted by Deanne Burton.
Deanne is looking for 9 Design Team Members to contribute projects, layouts and cards.
All geared toward going green with your Scrapbook & craft creations.
You will find all the details here.

There is still plenty of time to get your submissions in if you would like to be a part of this new adventure.
Hope to see you there!

Thanks for stopping by my world : )

Sunday, October 11, 2009

Batty Napkin Ring Holders

Fast and easy little project to help add that extra touch to your Halloween table.
Batty Napkin Ring Holders!


Using Eco friendly adhesive backed felt.


Using the template provided, cut four bats from black card stock
Using template again cut four bats from adhesive backed felt.


With right sides down slowly peel back paper backing from adhesive bat and apply down card stock.
Wrap around napkin attaching through with the notches.
Thanks for stopping by, hope you have a ghoulishly fun week. : )


Monday, October 5, 2009

RIP Pumpkin King

A Creatively Green Project Challenge.
Using a box create a Halloween themed project for under $5.oo.

Here are the bones for my project.
Styrofoam ball .50 from my personal supplies
Free Newspaper
salt flour & water from my kitchen
Paint ,Mod Podge ,hot glue and Ink from my supplies.
I will estimate between $1.25 - $1.75 worth of supplies to complete this project.

The end result... a Paper Mache Pumpkin King Tombstone.


I used the hot glue to create my inscription and added dimensions


While I am on the subject of tombstones.....it is the Halloween Season after all !

What better than a Graveyard for a Halloween delight or fright !

My Great Grandfather was a Stone Mason.

Entering into business with his brother they carved a living, out of Memorials for the deceased.The above monument photograph was sent to me, by one of his Grand daughters while researching this branch of my family tree. What a treasure to come across.
The story goes that he carved and was particularly fond of this piece, so the photo continues on today.

It's resting place, the rolling hills of Forest Hill Cemetery Utica, New York.

A beautiful landscape of hills and valleys surrounded by trees .On this video at time marker 1:32...not positive but I believe you may see this Stone Angel .

Next trip up North I think I will have to check this out.


One can not discuss Cemeteries with out mention of the "City of the Dead"to be found in the City of New Orleans.very interesting history behind these Crypts.


Another unusual cemetery is located in London, England.

The grounds and the carvings are stunning.
You may read a little of High Gate Cemetery's history here , you will also find some additional hauntingly beautiful images.


Here you will find some tombstone Epitaphs of some famous people.
For a little Halloween fun stop by here and create your own Epitaph.
Thanks for stopping by :).

Tuesday, September 8, 2009

Going Green for Halloween

Fall is here...maybe not on the calendar...but defiantly in the air.
Which means, for those who join in, the spirit of Halloween will soon be upon us.

A fun little green project to try
Using an empty cookie tin.


a tree branch, scrap pieces of card stock and some fishing line.


Some paint, favorite Halloween stamps, Distress stickles, bling and of course some Mod Podge to seal.

and you have a fun little Halloween Decoration !
For those crafters who are leaning toward incorporating your toss outs in to your projects.

There is a new store online called Creatively Green where you are able to locate Eco friendly craft products for your Scrapbook pages and projects.
Creatively Green also hosts a Message Board, where you will find inspiration to help in your efforts to craft green.
Stop by and check out their blog and find some great tips and projects.

Take care and thanks for stopping by : )

Friday, August 28, 2009

Tin Goes Green

A good day to you : )

A little project for you using your household tin. Tin and Faux Tin Luminaries!

I have wanted to try this technique for some time, my first attempt at tin punching.
Hopefully it will get better with practise.

Though, I really do need to learn how to photograph objects in the dark..I apologise for the blurry candle shots.
With that said, I am pleased with the outcome and look forward to trying this project again.


Wash and dry your cans.
Fill with water and let set over night in the freezer to harden
Laying out a towel to catch the chips of ice and water that thaws.
Draw a pattern or tape your pattern (all the way around the can, to the other side of paper)
Using a nail and small hammer, punch out your design.
Paint or decorate to suit your taste. ( I first used Gesso to give it some tooth)


Next up is a faux tin punch


Using a empty pickle jar, cleaned and dry, with label removed.
Using that pesky last strip on the aluminium foil roll, that just never really seems to fit anything.
Size to jar and fold over ends smooth.
tape your pattern to the middle of the foil strip.
Using a needle punch out your pattern. ( make sure you have a piece of foam under your foil)
tape foil at the back to the jar.
This would make a great party decoration , easy to adapt for any theme.
Thanks for stopping by...hope you have a Crafty Trash your Craft Day : ) !