"My darling girl, when are you going to realize that being normal is not necessarily a virtue?
It rather denotes a lack of courage."


~Practical Magic~

Digital Freebie Update

Just to let you know.
The digital freebies found on the right hand sidebar have been updated and now are ready for downloading.

Saturday, October 1, 2011

That time of Year

When my thoughts drift to Grand Pumpkins, apples and cider, fuzzy sweaters, cool sunny days and the beauty of the color in the trees.

 I thought it would be fun to share through out the month some crafty ideas to get you started for your Fall and Halloween decorations.

Tip Nut has a collection of DIY Halloween  tutorial projects collected from around the net.
  Here are just a few of projects that you will find on this link.
You may also click on the photo to go directly to the project.

                                      Silhouettes "The Pink Peony of Le Jardin"

                                     Tree Silhouette "Folding Trees"

Halloween Garland " Kansas City Etsy"

Cupcake Stand "The Swell Life"

Have fun and Thanks for stopping by :)

Friday, September 23, 2011

Fall has Arrived

                                            Practical Magic Blog Party

Frosted Petunias is hosting their Second Annual "Practical Magic Blog Hop"
With Fall now upon us, this Hop will certainly help to get one in the spirit of the season.

Also, fall is known for the season of football.
The Sisters of the "Sisterhood of Scrap" are hosting a Football Online Crop this weekend.
A perfect way to get gear up for the season.

                       There are some things I know for certain: always throw spilt salt over your left shoulder, keep rosemary by your garden gate, plant lavender for luck, and fall in love whenever you can

Sally Owens~ "Practical Magic"

Sunday, September 4, 2011

A Little Boot

Been some time since I have posted.
Oh well, I am sure you all know how that can be.

I thought I would share a little Witches boot Template I had been working on ,while we had a visit from Irene last weekend.

I have a link at the bottom of this post if you would like to try the Witches boot for yourself.

The template is pretty much self explanatory, but here are a few tips.

I used a Cornflake Box to trace my template unto as I wanted a sturdy boot. You may use card stock, Patterned Paper or whatever your heart desires.

Using the fold lines as your guide assemble your boot template.

DO NOT GLUE!! the 2 front Boot Tabs together until after you have inserted and glued the boot insert. Then go ahead and glue the tongue template to the toe and the inside of one of the tabs on the front of the shoe.

After this step you may glue the tabs together and add the Outer Toe Template.

Now you may choose to decorate or paint your template before assembling or after it is all up to you.

Here is where you will find the 4 parts needed to create this boot.
Have fun and Thanks for stopping by :)


Saturday, February 26, 2011

February Projects of Love

February projects have been a labor of love for me.
Each one is an outward expression of my month of Love.

I like to use challenges to help keep me motivated. Making sure bits of time are in the day for a creative outlet.
 Which is very limited these days !
Combining a "Catch Light" photo challenge and a challenge by Helen to use four different types of stickers inspired this fun project.

A canvas (Dollar Store) and Crackle paint for my background
 Poppies and a beautiful little girl (one of my Granddaughters) helped to inspire!

Pleased with finally using up stickers that I have had around for some time.


Art Journal Project

I really wanted to slip in some time to work on my Art Journal this month and again used a Word challenge for creating a scrapbook page .
Sadly, I thought I had saved the link to this challenge site. So sorry :(

The word to inspire was "Drama"
My art journal is based around trying different techniques and mediums.

Using Plastic Wrap and acrylic paints to create the background.
Clear Acetate Sheet used to create the wings with a touch of "Dollar Store" Glitter Glue.
Stenciled in the stone wall onto black Card stock.

Part of the Challenge... use journal on your page.
 I thought it might be fun to push myself and use symbols for what I was trying to express.


Clear Crackle Glossy Accents add both a smoky glass effect to my door and age to my hand Silhouettes.

Quote by Erma Bombeck

When I stand before God at the end of my life,
I would hope that I would not have a single bit of talent left, and could say
"I used everything you gave me."

Love the Time Piece from Tim Holtz Collection!
Thank you Paper Secrets for all the hardware!

             The  "Sisterhood of Scrap" Hosted a Month Long 
                               "Your Crop Your Way "
                           for the month of February.
      Sisterhood Feb "Your Crop Your Way" Challenge
     Jackie's Challenge /  Love, Acetate and Hidden Journal 

      Paper Secrets /  Feb Technique Challenge
Two very loving people I know...my DS AND DIL.

I loved seeing you both over the Holidays, thank you for the Christmas memories XXOO


Sisterhood Feb "Your Crop Your Way" Challenge 
Lindy's Sketch Challenge using a Sketch found on Page Maps.com

My youngest Granddaughter ,DS & DIL celebrated her first Christmas this year.
What a happy little baby ! XXXOOO


Sisterhood Feb. "Your Crop your Way" combined 2 challenges

Tabitha's Challenge / Journal Strips


 Jo's Challenge / 3 different ribbon used 3 different ways.

My 2 little Granddaughters and (Grand niece in the middle)
A special little moment they shared together at their Great Grandmother's house over the Christmas Holidays.

Silly little girls... :) XXX OOO

And my contribution challenge to the "Your Crop Your Way Challenges"  Create an ATC Holder.

The SOS is also hosting an ATC Swap for the month of Love,
this little project could come in handy for those of you who like to create and trade those little pieces of Art.

Will post my ATC once the swap is complete.


Here are a couple of videos to help along in creating these
  little holders.


Last, certainly not the least  this wonderful Art Inspiration piece contributed to the "Your Crop Your Way" Challenge by Gail D.

Also, my inspiration came from two very special friends in my life.


Will post my finished project in the next day or so.
There are photos, links and details I would like to share with you for this project.

This beautiful piece of Art Work inspired me in so many different ways, one of the favorite ways I like to challenge myself.

Thanks so much, Gail for sharing this lovely and serene art work.
I think I would like a copy of this for my home!

And to my long lost friend.  Laurie...it was a lovely surprise to reconnect with you after so many years!
Enjoyed our visit very much.
Happy you liked and could use the "Paper Bag Wreath"  

Thanks for stopping by ... it's always a pleasure to see you all  :)

Wednesday, January 26, 2011

Poppy Flower Tutorial

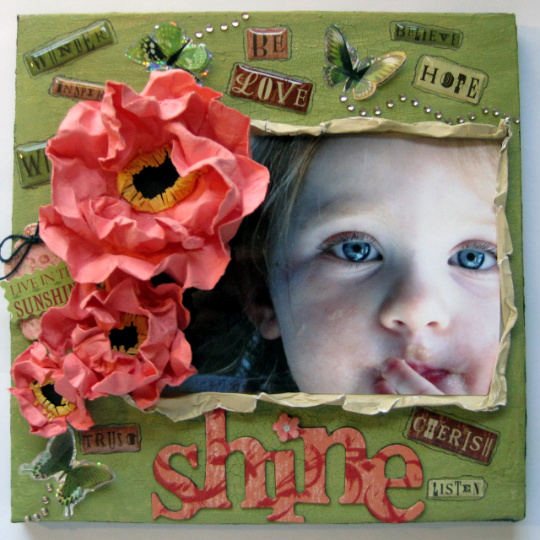
 I would like to share with you a tutorial on some Card stock Poppies I have been working on.
Very easy and fun to create.

A template link for the petals and center of this flower will be posted at the bottom of this post.


                                                  Products used
                                     Card stock and Clear permanent glue


                  Cut 7 Petals, 1 Stamen and 1 Center from the template.


Spritz your petals with water, fold in half then roll them into a ball.


Let dry slightly, then gently unroll.

Beginning with your first petal layer.
 Glue one end onto the other slightly overlapping your petals.

Using a total of 4 petals for your first layer.

Moving on the same way with your next 3 petals ,applying to your bottom 4 petal layer.


While your petals are drying, take your Stamen piece and slightly fringe the edges.
Roll your edges towards the center.

Gluing your center piece unto your stamen piece.


Add to the center of your flower.

That's it!

A little tip for you.
I like to apply my center to my poppy while my petals are a little damp. That gives me a little freedom to shape the petals as I would like them to appear.

Here you will find a template for your flower.

Thanks for stopping by my Craft World :)